Written by Jon Cahill
Safety Warning: Always wear wrist guards, knee guards, elbow guards, and a helmet when riding a unicycle.
A beginning rider should always have a spotter assisting him/her when attempting to ride a unicycle.
Unicycling involves balance in every direction. The base of support, when sitting on a unicycle, is approximately 2 square inches where the wheel touches the ground or floor. The base of support and center of gravity changes constantly. The unicycle wheel can move rapidly out from under the rider. This is particularly dangerous when the wheel moves rapidly forward causing the unicyclist to fall straight down or backwards onto the hip, pelvis, back, head, or hands. Unicycling involves speed, motion, rapid change in balance/direction, and falling. Even with proper spotting, teaching, and safety gear, there is the potential for injury. Anyone attempting to ride a unicycle does so at his/her own risk.
Once mastered, riding the unicycle is just about as easy as walking and quite safe. There is always a potential for injury even for the advanced unicyclist. This potential for injury exists when participating in any activity involving speed and motion. Unicycling is no exception.
The most important attribute in learning to ride a unicycle is a willingness to practice. Anyone can learn to ride the unicycle.
Surface requirements: Riding surface must be flat and smooth. (Riding down curbs and over mountains will come later.)
Space: Riding area must be unobstructed and spacious for beginners. (Advanced unicyclists can ride in a 3-foot square.)
Beginning Sequence
Step 1 – Unicycle Positioning
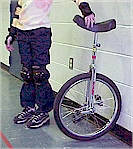 Position the unicycle so that the cranks and pedals are parallel to the floor and the wheel and rear of the seat are in contact with a flat wall space.
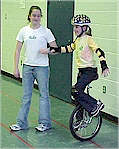
Step 2 – Ready Position
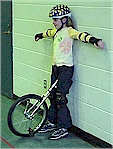 Roll the unicycle away from the wall. The rider stands directly between the unicycle and the wall. Place the seat between legs so that the unicycle is now on an angle just in front of the rider. The rider’s back should be resting against the wall, both feet on the floor. The seat is positioned between the legs (at the crotch). The arms should be flat against the wall at right angles to the body for support.
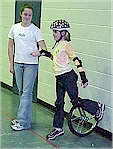
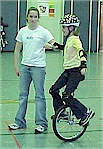
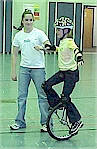
Step 3 – Spotter Placement
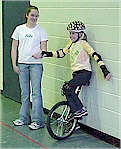 The spotter should stand directly to one side and at arms length distance from the rider. The rider holds on to the spotter’s forearm. DO NOT HOLD THE SPOTTER’S HAND.
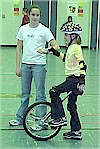
Step 4 – Wall Mounting
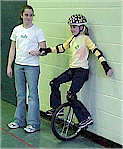 The rider is now in Position 2 but holding on to the forearm of the spotter with one hand. The other hand and arm are positioned against the wall for added support. Next, the rider steps on to the highest pedal and pulls backward and then downward. This action will force the unicycle under the rider, causing the rider’s back to slide up the wall. The rider is now in the mounted position on the unicycle, seated directly over the unicycle wheel, using the spotter and the wall for support. Cranks and pedals should be parallel to the floor when the rider is mounted.
Step 5 – Wall Dismounting
 Before attempting to ride the unicycle the rider must first practice falling forward and dismounting. Using the spotter for support, the rider simply loses balance in a forward direction and steps on to the floor. Dismounting with a spotter should be practiced repeatedly until the rider learns to fall forward safely stepping on to the floor.
Step 6 – Unicycle Riding
From the mounted position (Step 5) the rider falls forward and lightly pedals the unicycle in the direction of the fall to keep the constantly changing center of gravity over the unicycle wheel. This pedaling action will keep the wheel under the rider. The spotter should walk beside and slightly forward in relation to the rider. If the rider pedals faster than he/she is falling forward this will cause him/her to fall backwards. As the rider becomes more stable he/she relies less on the spotter and eventually will be able to ride unassisted. This will take time, days to weeks.
Step 7 – Rear Dismounting
As soon as the rider is comfortable working with the spotter, it is time to practice dismounting to the rear. Assisted by the spotter, the rider comes to a stop and falls slowly backward stepping onto the floor. Practice this repeatedly.
Step 8 – Floor Mounting With Spotter
 The rider should not attempt mounting from the floor with out using the wall until he/she is proficient at riding unassisted. The rider positions the unicycle so that the cranks are parallel to the floor. Using the spotter for support the rider places the seat of the unicycle between the legs at the crotch and places one foot on the nearest pedal (lets say the left foot/pedal).
 Without putting any weight on the left pedal (rear), but holding that pedal in position with the left foot, the rider jumps form the right foot to an up right, seated position, quickly placing the right foot onto the right pedal (front). Now the rider is balanced in a mounted position, seated on the unicycle. Remember to keep the body’s weight on the seat. The rider then falls slightly forward and begins pedaling/riding forward. This entire mounting sequence takes about 2 seconds to complete. With a little practice the rider will soon be mounting unassisted.
 Points to remember: (1) always use a spotter, (2) keep the body’s weight on the seat NOT ON THE FEET, (3) lightly pedal the unicycle in the direction of fall, (4) always attempt to step on to the floor when falling, and (5) always use protective gear.
Sequence developed by Jon Cahill
Copyright © 2002